Ever came across the situation of needing a space to work one way and in the next moment exactly the opposite way? Was your conclusion a 2nd control to avoid cycles in Maya? (Scroll to short answer)
Long answer
Imagine the situation of having a weapon in the rig for instance – some animators might just want the hands to follow the rifle, makes sense, right?
But some animations using the same rig are made for a pistol instead – it’s understandable that your animators might want to animate the right arm instead of the weapon control.
You come up with a smart way of making the left hand having a right hand space and a world space to accommodate for this. Then out of nowhere the direction says that you’ll need to support a left handed weapon animation. It gets more and more complicated and it can be very frustrating.
You will most likely end up in a cycle if you don’t use two controls for your weapons in the first place and you still haven’t solved the situation for making the left hand follow the right hand and then switching to make the right hand follow the left hand.
Short answer
It can be veeeery frustrating.
The solution in theory
I think I might just have the solution for you.
As with anything, there are a few ups and downs for this. So check it out and make decide for yourselves whether this method is for your workflow or not.
You can actually create any type of space (body, world, left hand, right hand, weapon, magazine, hips, head, and so on) and make any control use any of these spaces – without running into cycles.
I normally create a list of spaces where I can get the world position and rotation of a specified joint or control and then have other controls access this information.
This control has a space group above it in the hierarchy which is constrained to the different targets.
The key is that I deactivate the unused targets. Note that we are “switching” spaces, not blending between two spaces.
With my method we can enable and disable space targets for that control by using only node network logic – therefore completely avoiding cycles.
To disable a space I set its constraint nodeState attribute to “blocking”. This stops evaluation entirely. And that is very important if we don’t want to have glitches due to hidden groups wandering off in space until they are needed again.
If you haven’t seen a cycle in maya yet, then you either haven’t rigged much, you were lucky or you are just a genius 🙂 So we both know you have seen it before and this cyclic double transformation effects where your constrained objects disappear in space with incredibly high values on their transform attributes.
If you haven’t – constrain an object A to an object B and create another constraint from object B to object A, then move one of those 😉
Enough ranted about this, it’s time to show you how it’s done.
Here is how it’s done
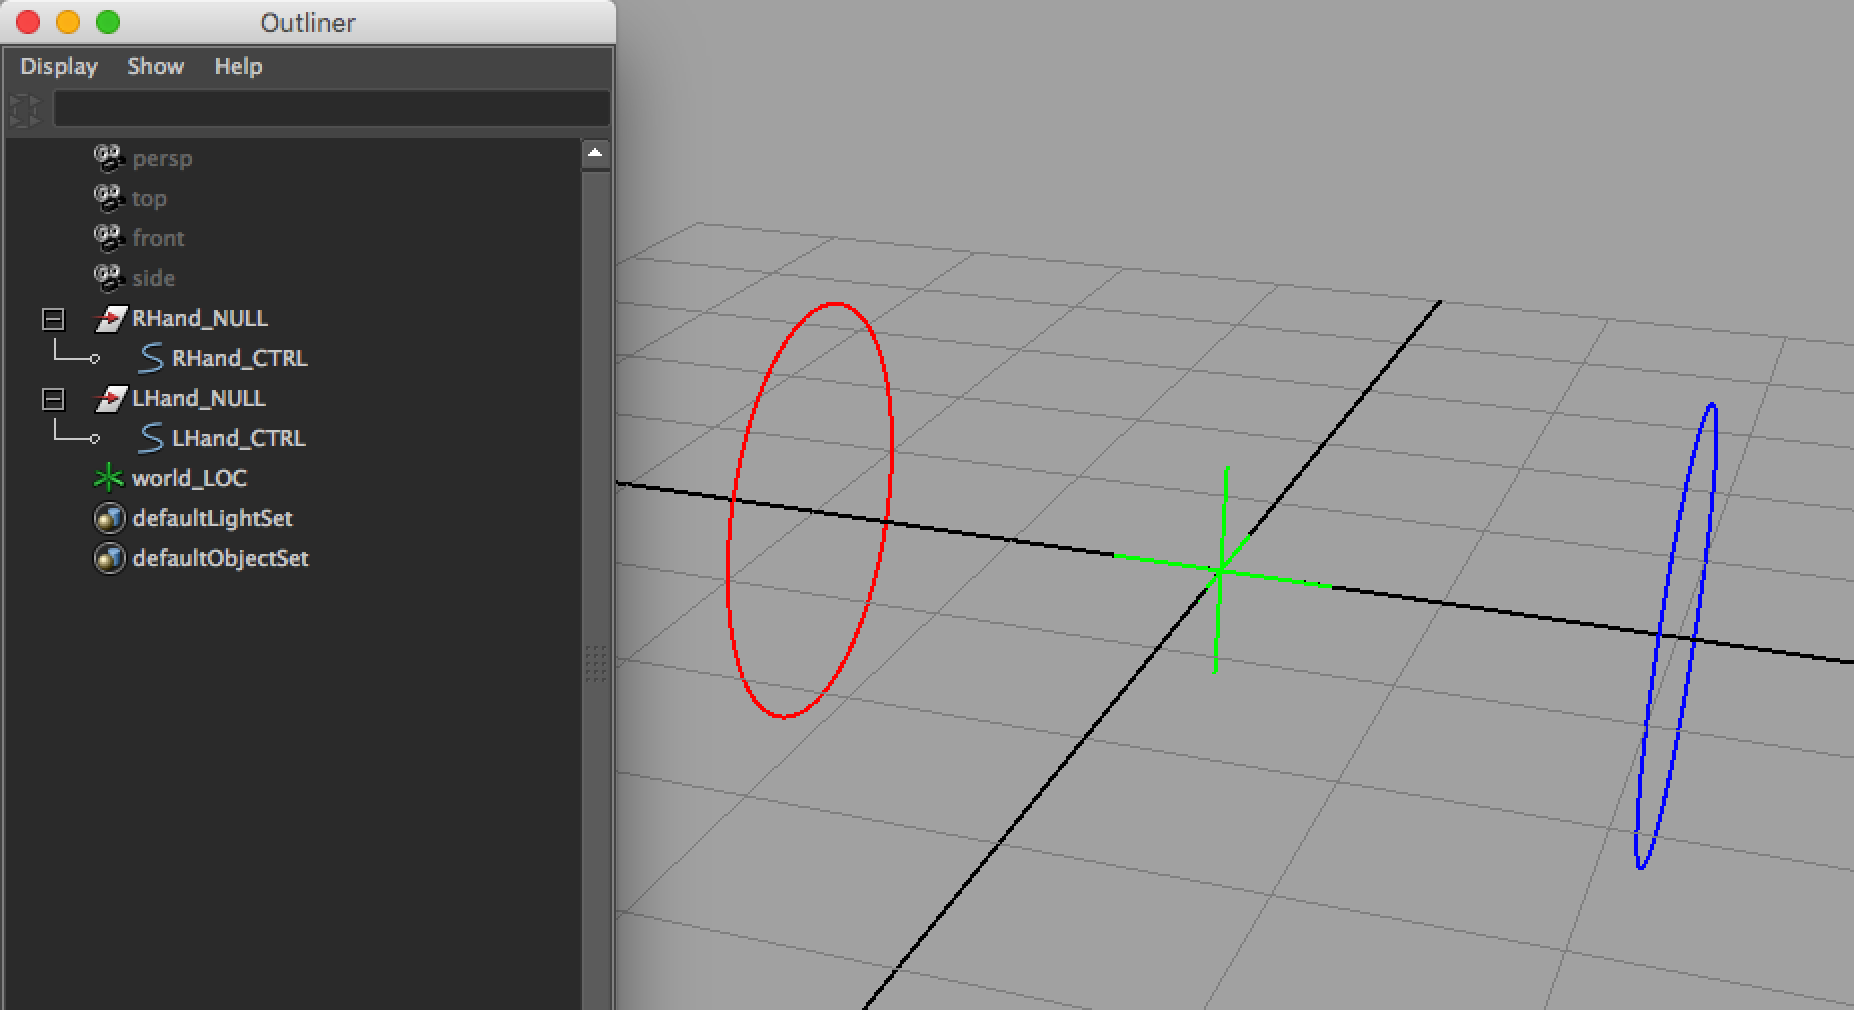
I was thinking whether I should show you this tutorial implementing this into a rig or whether it’s better to not have the scene and outliner cluttered with too many nodes. I decided to work on an empty scene instead but you just need to believe me, that it works beautifully in a full rig.
Preparation for this tutorial
In a rig you might have 2 IK/FK arms. The IK wrist controllers are the ones we want to have this complex space switching between world and each other’s side IK controller.
To make it easier for this tutorial I will call my 2 IK controls for the hands LHand_CTRL and RHand_CTRL.
I put my controllers in a NULL Group so that all values are 0,0,0 in translation and rotation.
Also you usually have a resulting joint chain that gets the blended position between the IK control and the FK control depending on your blend value. You will definitely want to use the blended joints for your space rather than the IK controls directly. The reason for this is that if you were using the controls directly, you’d have a space that follows the IK controller only, but if you are animating the arm in FK, the space wouldn’t be influenced but stay with the IK control. In this tutorial however I will just use the controls as I don’t have a full IK/FK setup to not make it more confusing.
Also in this tutorial we will need something for World Space – a locator called world_LOC will do for us. This can be constrained to the global Control of your rig or anything that stays in world or moves relative with the whole rig is fine.
Hooking things up
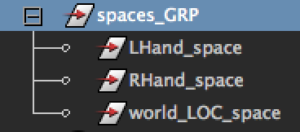
First we need a group in which all space targets sit. Let’s call it spaces_GRP.
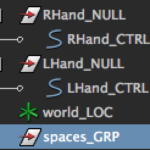
For each space we want to expose, we create another group which will be constrained to the according transform. So for example for the world space we create a group called world_LOC_space, and for the hands LHand_JNT_space and RHand_JNT_space. I name them the same as the actual targets, to make it easier to understand what each group’s purpose is rather than having to look at the group’s connections. What I prefer doing in general is also creating message attributes and connecting them, so that it is easy scripting wise. I dislike name based scripts. Especially when you work with namespaces or multiple characters. So unique names and connections are a big part of my way of doing things.
Now we constrain each of these group to the appropriate transform – use a parent constraint or point/orient constraint mix maintainOffset turned OFF. Note: even if you plan on creating a space for rotation on one control I would still advise you to constrain the translation on those targets as well, to avoid math problems or inconsistencies down the line. You can always change it later however to optimise your rig. The actual space connection to the controller, which we will create later, is the place where you want to make sure, which constraint you are going to use – rotation, translation or both.
So we got the spaces defined. Now we can move onto assigning the spaces to the controllers. Let’s start with one of the hands.
Obviously we will need an enum attribute with which we define the spaces the controller is going to have. In our example we will have a world space and the space for the other hand.
As we don’t want the RHand_CTRL for instance to snap to the world position when we switch into the world space, we need to create offsets for the targets. For each space the controller is going to use, we need to create another offset group inside the according space group we previously created. This will be a group that maintains the offset between the space target and the controller using that space. This offset is only created in bind pose, so we don’t need any further constraints.
In other words, we create one group inside the world space group and one group inside the other hand space group and snap both of those groups onto the same world position and rotation as the controller. I recommend naming the groups appropriately so that it is easier to understand what they are for.
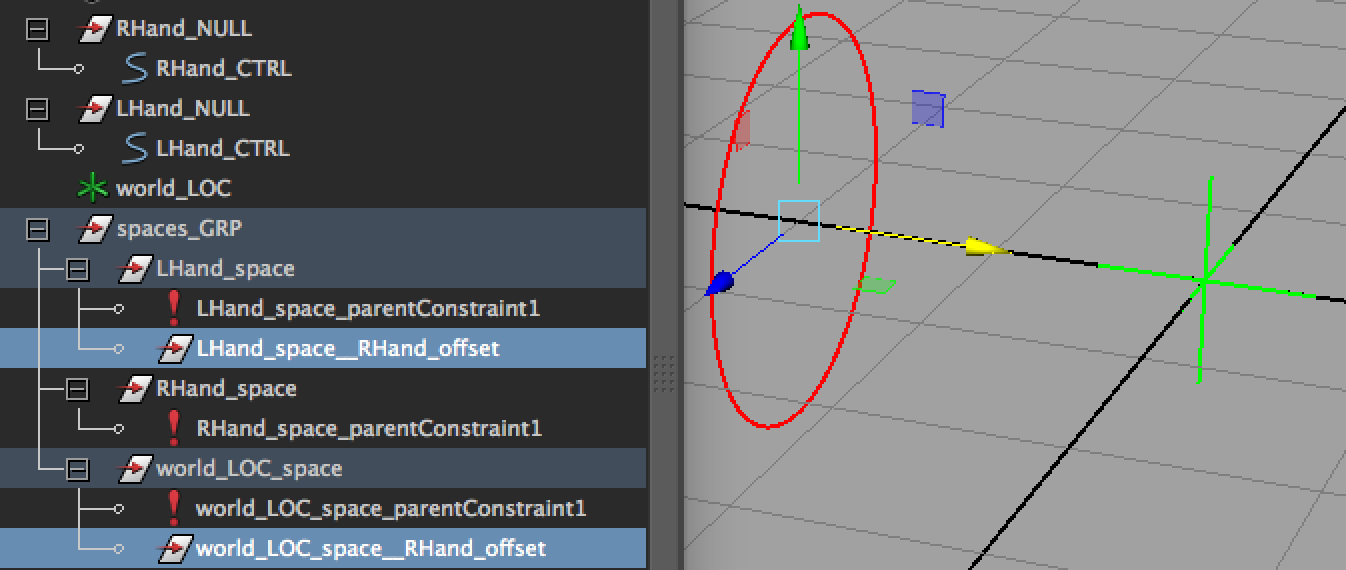
These offsets we just created are the targets for each space the control can snap to. We want the control to follow that target when switched to that space. The space group is world for instance and the target for the RHand_CTRL in world space is this world_LOC__RHand_offset.
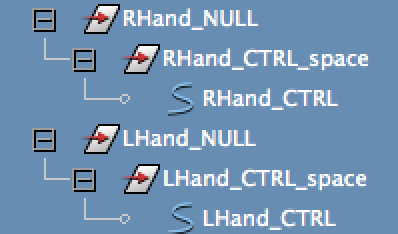
In the next step we create a transform group in the hierarchy of the control to move the actual controller. This is just a transform that is above the actual Control transform. The order does not matter so much, whether you make it a direct parent of the control or the parent of the control’s null group. Let’s call it RHand_CTRL_space and LHand_CTRL_space. Don’t forget to snap them into the same position and rotation as the controllers.
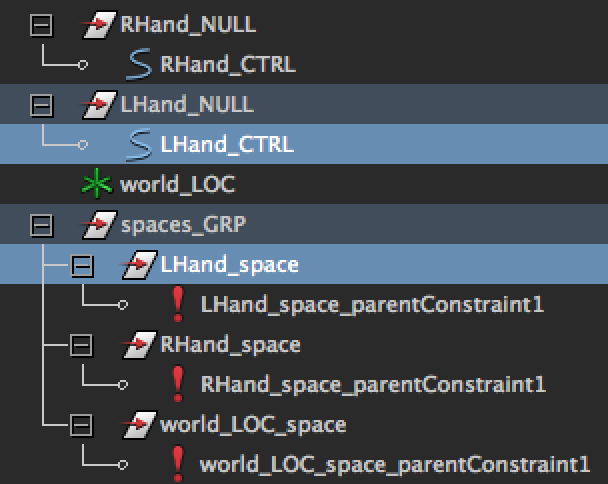
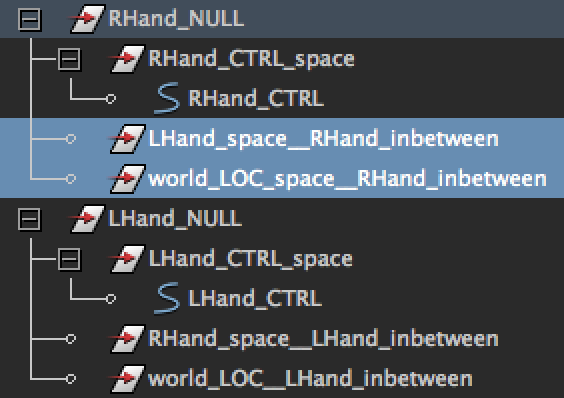
The last transforms I am going to create here are for making it actually possible to deactivate constraints when not needed. For each target in the different space groups I create an inbetween group that will be constrained to its target.
So now we connect it all together and will use only logic for setting the weights of the constraint we create on the CTRL_space group and also disable the unused constraints.
First let’s create the constraints. I simply constrain each inbetween space group to its target. Maintain offset can be switched off as the offsets should be zero if you have done everything correctly. Let’s call these constraints the INBETWEEN constraints.
Here is how it looks on RHand_CTRL

And this is what we should have if we repeat that for the other hand as well.

Now we select each of the inbetween groups and create a constraint on the CTRL_space group. Also without offset. Here you can specify whether you only want rotation, translation or both. Let’s call this constraint the RESULT constraint. This constraint is the last one for each control.

I recommend doing this for only one control, then proceed to the logic in the next part to avoid Cycles while you work.
Then once the control is done you can work on the next control. As long as you don’t move anything, those cycles can be avoided. But we want to be safe here so finish one and then start the next one. Also make sure that you put the control into a very neutral space like “world”. This will disable the other constraints and you won’t run into a cycle.
Now to the logic.
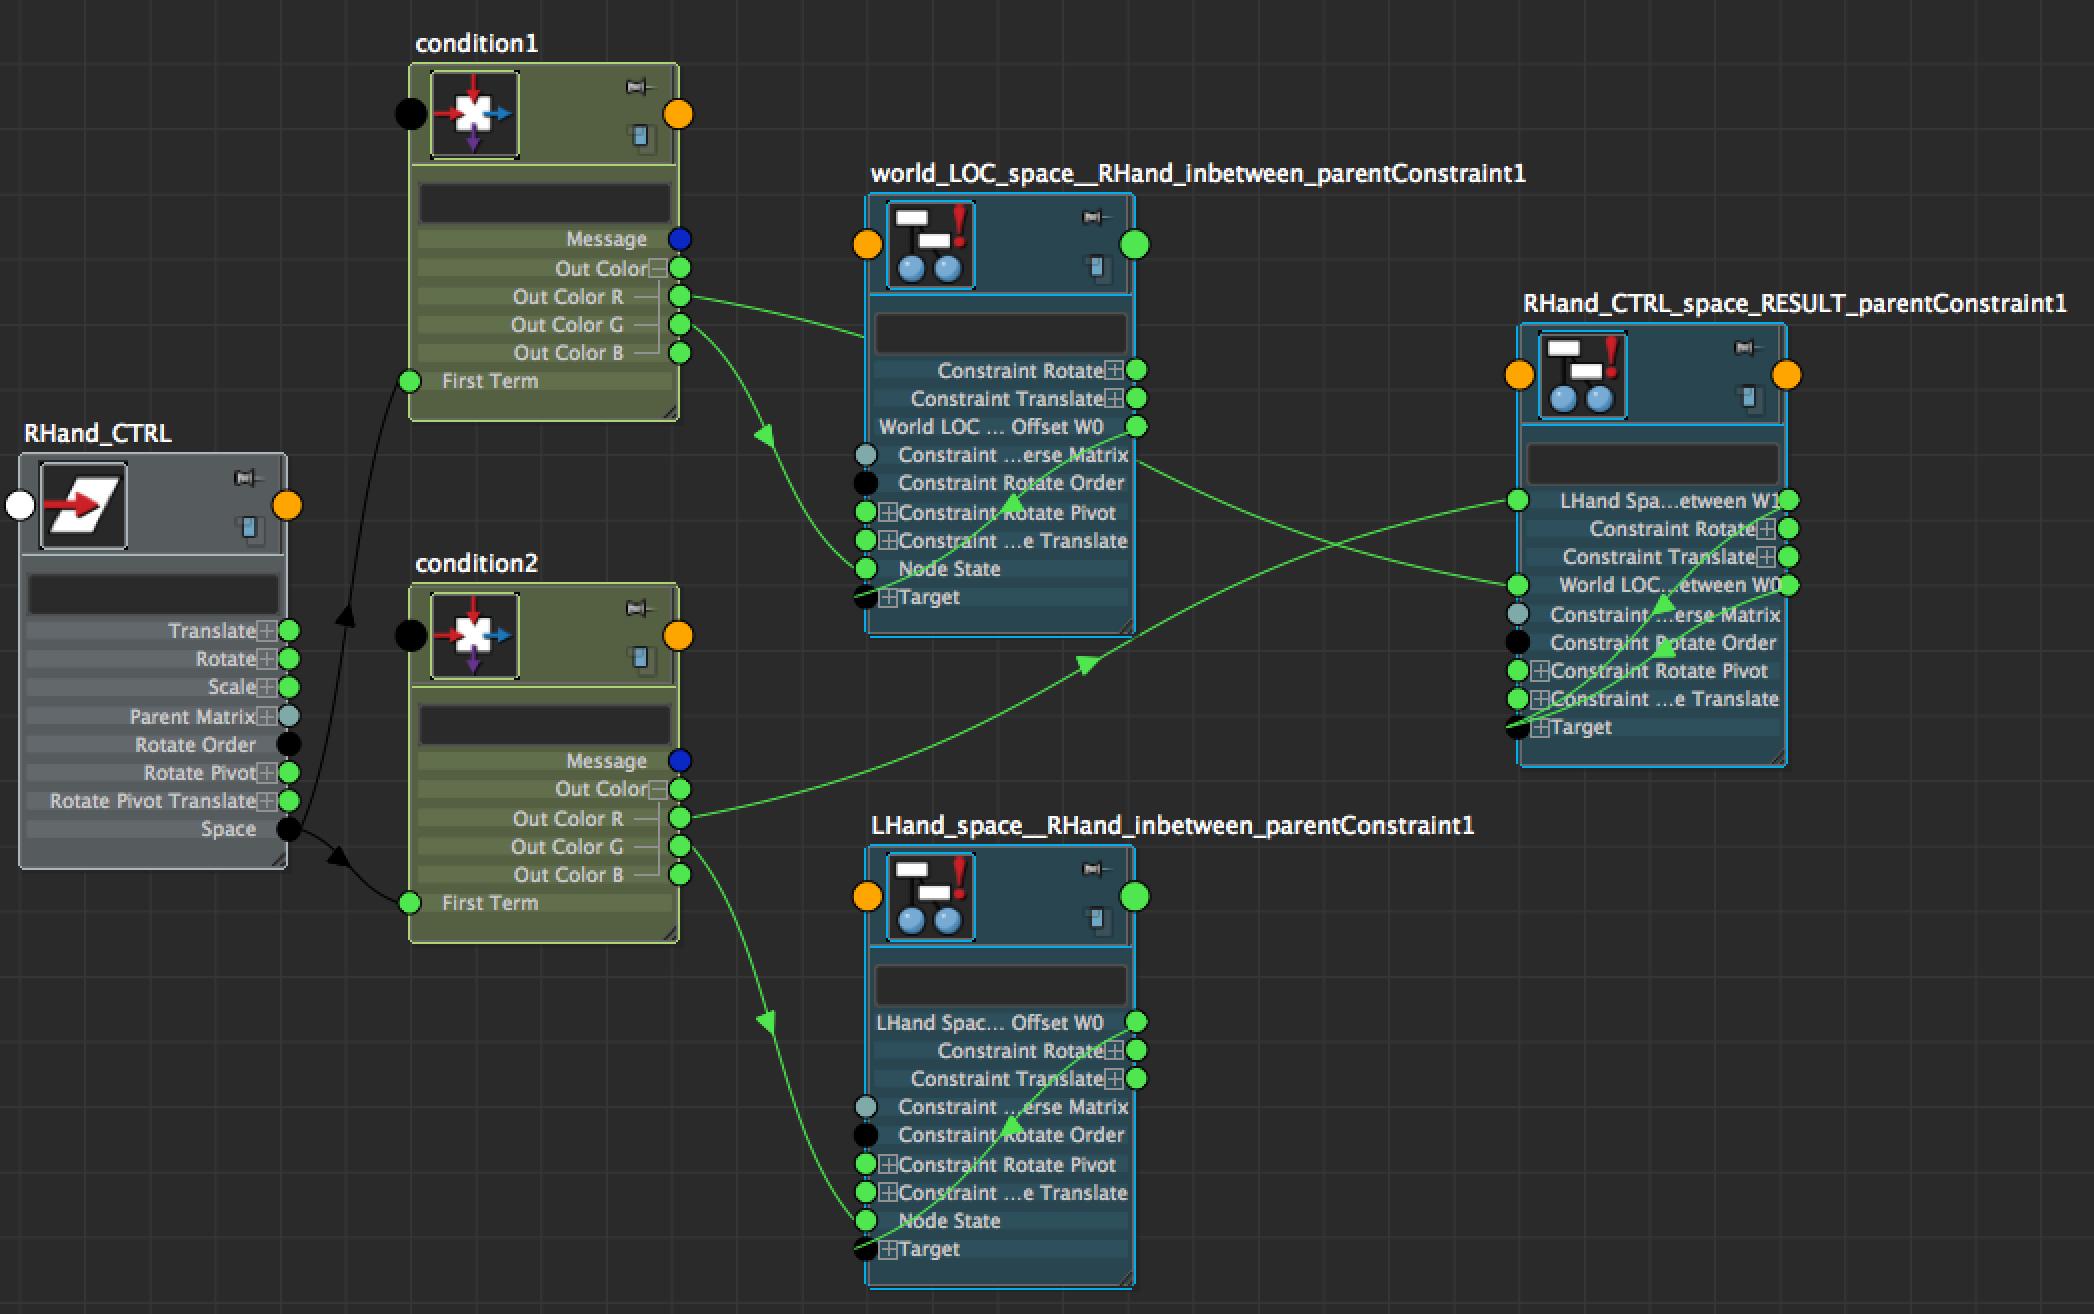
In node editor we create a condition node for each space of the control.
Connect the enum attribute on your control with each of the conditions’ firstTerm attribute.
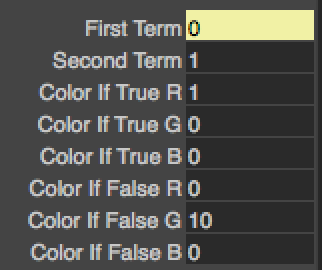
The secondTerm attribute you set depending on your enum values.
The first space in your enum has the value 0, the 2nd space has the value 1. and so on
Now we will need these values in the ColorIfTrueR = 1, ColorIfFalseR = 0, ColorIfTrueG = 0, ColorIfFalseG = 10.
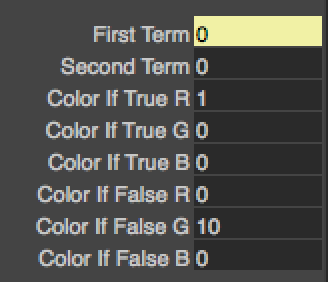
We now connect each OutColorR attribute from the conditions nodes with the weight value on the RESULT constraint. Make sure you connect them in the right order.
And now the key element: We connect the OutColorG attribute of each condition with the INBETWEEN constraint’s nodeState attribute. If the condition is not met it will output the value 10 – which is the equivalent of the nodeState “Waiting-Blocking”. This node state will disable the constraint altogether and not even evaluate it. Therefore we avoid the cycles completely. And that’s exactly why we need this extra layer of constraints.
If you repeat these steps for LHand_CTRL then you have full space switching capabilities.

You only have to make sure to not create a cycle yourself by enabling the left hand space on the right hand while the right hand space is enabled on the left hand. I think you get the idea.
In addition you can connect the OutColorR attribute to the INBETWEEN constraint visibility to easily see the constraint’s state in the outliner. In Maya 2018 invisible nodes will not be evaluated, so it might be also beneficial in some way.
There you have it. Nice spaceswitching. Feedback is very welcome.
In the next post I will write about some cons or things you’ll have to take care of.
Edit: I will also post a video to show the nice workflow with this way of space switching. I am currently on vacation, so this might take another week or two. So merry Christmas to all of you.

3 thoughts on “Complex space switching Tutorial”
Cool trick!
I’m gonna mess around with this. Thanks for sharing!
Hey,
very nice setup !
Do you still plan to da a video for showing the workflow and the pros and cons of this method ?
Thank you
Hey Sam, yeah I should have recorded a video a long time ago but always got something else to do. I can’t make any promise to do it before release of Battlefield V but I won’t forget about it. 🙂